Protecting Your Home from Silent Destroyers
Every year, these tiny invaders silently march toward homes across America, causing devastating damage that often goes unnoticed until it’s too late. Termite barrier treatments create protective zones around your home that serve as your first line of defense against these destructive pests.
These specialized barriers work in different ways – some create a toxic zone that eliminates termites on contact, while others establish physical obstacles that termites simply cannot cross. Think of them as an invisible shield surrounding your home’s foundation.
The threat is very real. Termites cause an estimated $40 billion in damage globally each year, with more than 600,000 U.S. homes suffering structural damage annually. What makes this particularly concerning is that most homeowners insurance policies specifically exclude termite damage, leaving you financially vulnerable without proper protection.
| Types of Termite Barrier Treatments | How They Work | Typical Lifespan | Average Cost Range |
|---|---|---|---|
| Chemical Barriers | Create a toxic zone in soil that kills termites | 5-12 years | $1,800-$6,000 |
| Physical Barriers | Use materials termites cannot penetrate (steel mesh, sand) | Up to 50 years | $2,500-$8,000 |
| Bait Systems | Attract termites to poison they carry back to colony | Requires ongoing monitoring | $1,500-$5,000 initial setup |
When properly installed, termite barrier treatments provide reliable, long-term protection for your home. Chemical barriers use specially formulated termiticides that do more than just kill on contact – they create a transfer effect that spreads throughout the colony. Physical barriers, which can be installed during initial construction or retrofitted to existing homes, completely block termite entry points, giving you peace of mind.
My name is Stephen Biggins, and I’ve seen the devastation termites can cause. As the owner of Biggins Exterminating Co. since 1982, I’ve installed thousands of termite barrier treatments throughout Massachusetts. These protective systems have saved countless homeowners from experiencing catastrophic structural damage to their most valuable investment.
What Is a Termite Barrier Treatment?
A termite barrier treatment is your home’s shield against destructive termites. Unlike spot treatments that just address visible infestations, barrier treatments create a complete protective zone surrounding your entire home’s foundation. Think of it as a defensive perimeter that either kills termites as they try to enter or physically blocks their path.
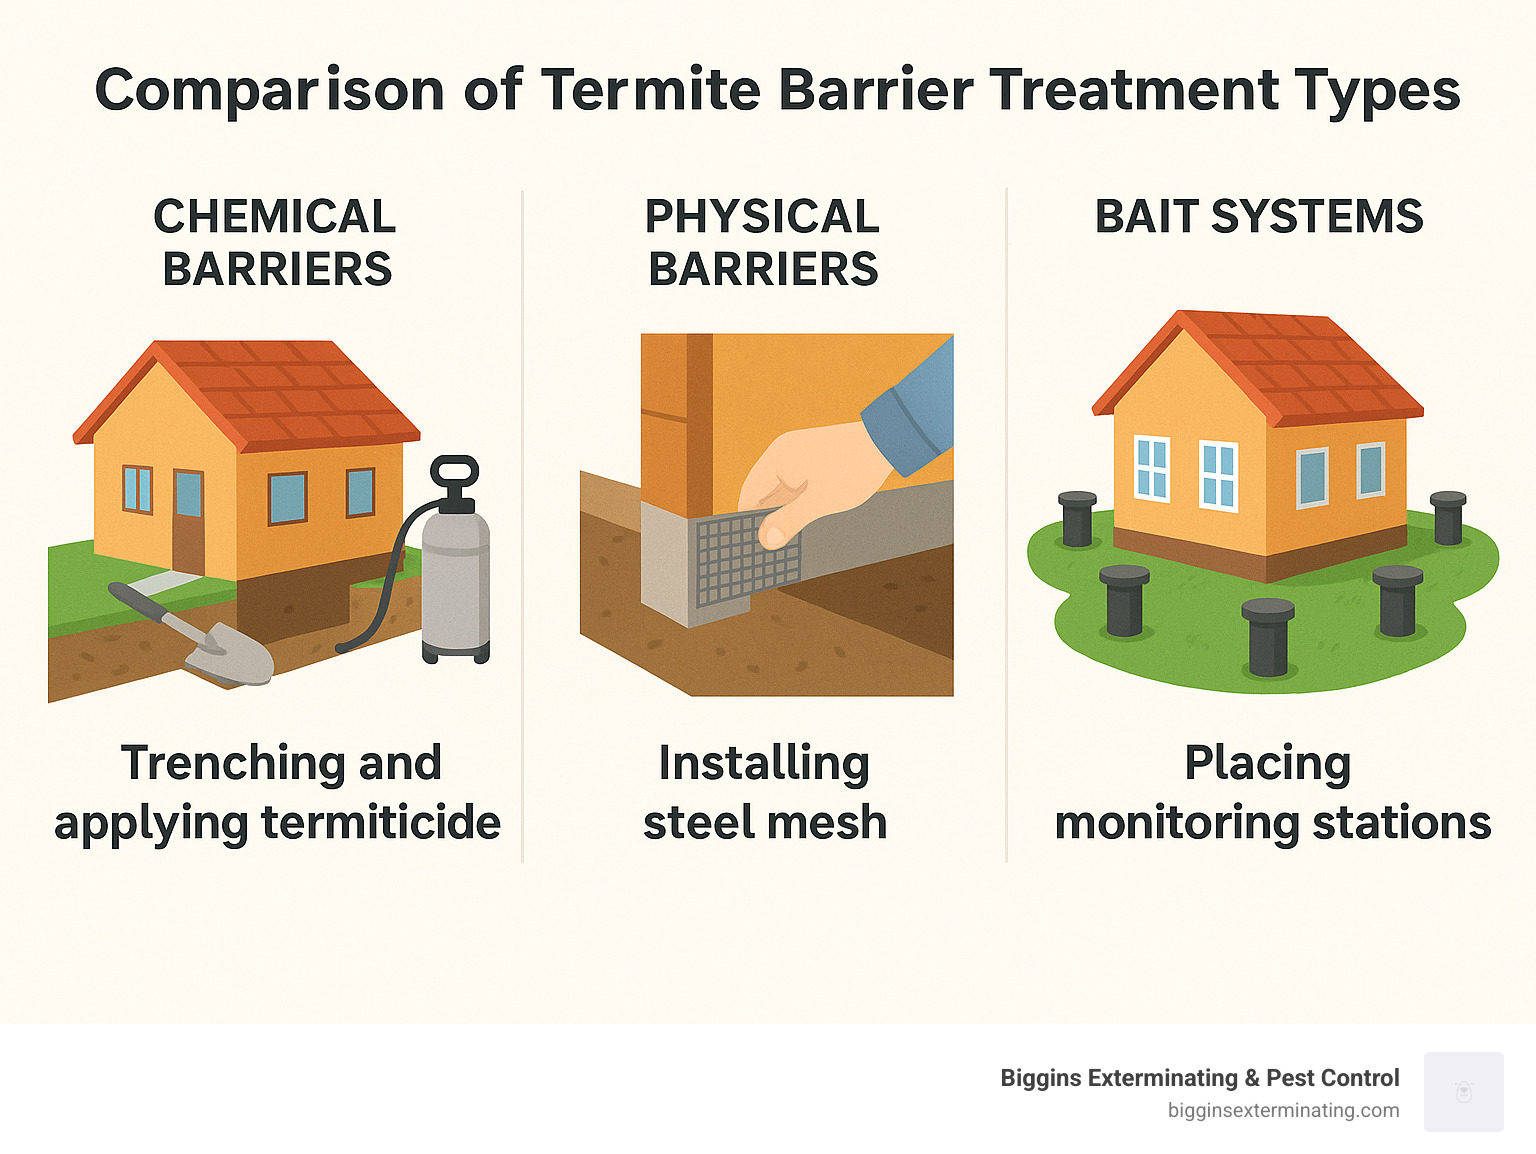
Most homeowners are surprised to learn there are actually three distinct types of protection available:
Chemical soil barriers involve applying specialized liquid termiticides to the soil around and beneath your home. These create an invisible toxic zone that termites cannot detect until it’s too late. When they attempt to tunnel through, the chemicals prove fatal.
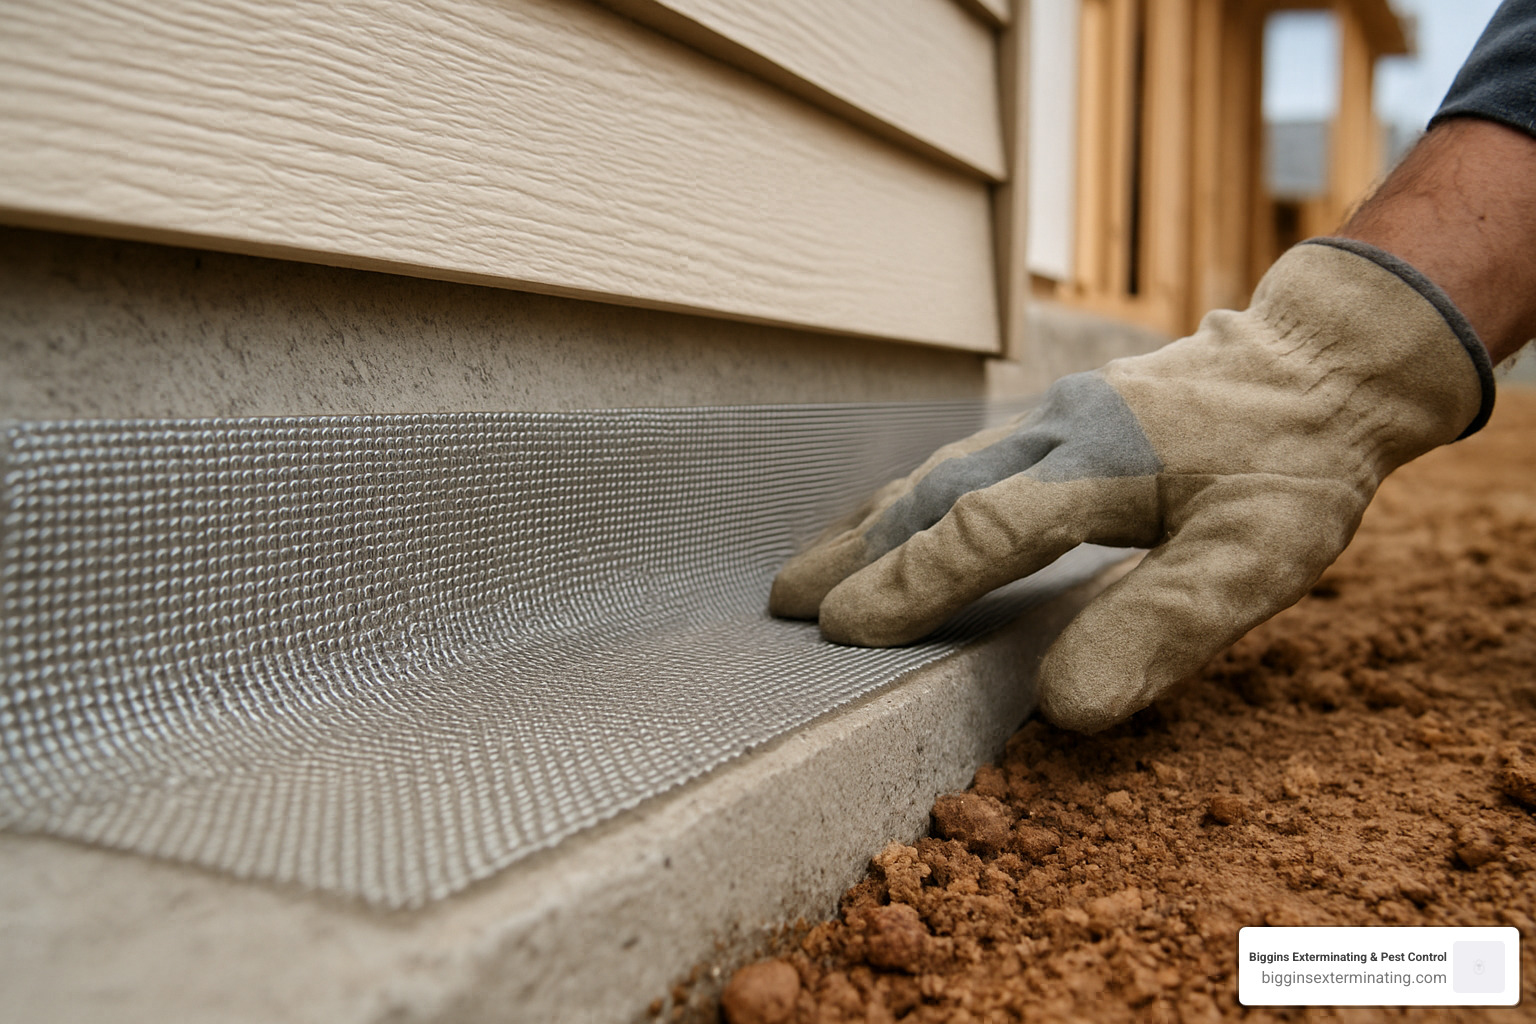
Physical barriers use materials termites simply cannot penetrate – like stainless steel mesh, precisely-sized sand particles, or concrete formulations. These work like a suit of armor for your home, providing a physical blockade against these persistent pests.
Bait systems, while technically different from traditional barriers, create a “ring of protection” around your property. Strategically placed stations contain materials termites find irresistible, but which ultimately eliminate entire colonies before they reach your home.
You can rest assured that all professional-grade termiticides used in termite barrier treatments must undergo rigorous EPA registration and testing for both effectiveness and safety. This regulation is particularly important here in Massachusetts, where our native subterranean termite (Reticulitermes flavipes) poses the primary threat to local homes.
Why Homeowners Need a Termite Barrier Treatment
Protecting your home with a termite barrier treatment isn’t just about preventing a pest problem—it’s about safeguarding what might be the biggest investment of your life.
Structural safety concerns should be top of mind for any homeowner. Termites are sneaky destroyers, consuming wood from the inside out and leaving minimal external evidence until damage becomes extensive. By the time you notice visible signs, these insects may have already compromised critical structural supports in your home.
The EPA notes that “most homeowners do not realize they have termites until they see a swarm or find damage during construction.” This silent destruction can weaken floor joists, wall studs, and roof trusses—potentially creating truly unsafe living conditions for your family.
Perhaps the most compelling reason to invest in protection is the insurance coverage gap most homeowners don’t find until it’s too late. Standard homeowners insurance policies typically exclude termite damage entirely. This means without a barrier, you’re risking paying thousands in out-of-pocket repairs that could have been prevented.
The long-term return on investment makes barrier treatments a smart financial decision. When comparing the cost of a termite barrier treatment (typically $1,800-$6,000 based on internet data) to the average termite damage repair cost of $3,000-$8,000, the math becomes clear. A properly maintained barrier system can protect your home for 5-50 years, depending on the type installed.
Here in Wilmington, MA and surrounding communities like Bedford, Burlington, and Lexington, we at Biggins Exterminating & Pest Control have witnessed countless homes where timely barrier installation saved homeowners tens of thousands in potential structural damage. After 40 years serving Massachusetts families, we’ve seen how this preventative approach pays dividends for decades to come.
How Termite Barriers Work: Chemical vs. Physical
Ever wonder what’s actually happening beneath your soil when a termite barrier treatment is installed? Understanding the science behind these protective systems can help you make a smarter choice for your home’s long-term protection.
Chemical Barriers
Today’s chemical barriers are engineering marvels that take advantage of termite behavior. Unlike older products that termites could detect and avoid (often finding the tiniest gaps in protection), modern non-repellent termiticides are completely undetectable to these wood-destroying pests.
When unsuspecting termites wander through a treated soil zone, they don’t drop dead immediately—and that’s actually by design. Instead, they pick up the active ingredient on their bodies and continue their normal activities, completely unaware they’re now carrying a powerful weapon against their own colony.
“It’s like a domino effect,” explains Stephen Biggins, who has installed thousands of termite barrier treatments throughout Massachusetts. “The treated termites return to their nest, spreading the chemical to others through their natural grooming and food-sharing behaviors.”
This “transfer effect” is what makes modern chemical barriers so devastatingly effective. As termites die, others cannibalize them, further spreading the active ingredient until colony collapse occurs. According to scientific research from the USDA Agricultural Research Service, termites have specific wood preferences, which helps pest professionals predict movement patterns and optimize barrier placement. You can learn more about what wood termites prefer from the USDA’s research.
Physical Barriers
Physical barriers take a completely different but equally effective approach. Rather than killing termites, these systems create impenetrable boundaries that termites simply cannot cross. Think of them as the moats around your castle.
Stainless steel mesh barriers use precisely engineered apertures (typically 0.018 inches or smaller) that create a physical barrier too tight for even the smallest termite to squeeze through. These are often installed during construction beneath concrete slabs or around pipe penetrations.
Basaltic particle barriers use specially sized sand or crushed stone particles that termites cannot move or tunnel through. The particles are too heavy for termites to push aside, yet too large to fit between their mandibles for removal.
When faced with a physical barrier, termites must reveal their presence by building visible mud tubes around the obstacle to reach wood sources—making detection much easier during regular inspections.
Chemical Barriers—Active Ingredients & Efficacy
The science behind chemical termite barrier treatments has advanced dramatically in recent decades. Today’s most effective products use one of several thoroughly researched active ingredients:
Fipronil (the active ingredient in Termidor) works by disrupting termites’ central nervous systems. What makes it remarkable is its delayed effect—termites don’t die immediately, allowing them time to spread the chemical throughout their colony before succumbing. USDA Forest Service field trials have shown an impressive 100% effectiveness over 8 years when properly applied.
Imidacloprid operates similarly but through a different mechanism. It also affects the nervous system but binds to different receptors. This non-repellent provides reliable protection for 5-8 years in most soil conditions, making it a solid choice for many Massachusetts homes.
Bifenthrin takes a different approach as a repellent termiticide. Rather than letting termites pass through and spread the chemical, bifenthrin creates a barrier that termites actively avoid. While this means less colony elimination, it still provides effective protection for 5-7 years.
Soil type, moisture levels, and environmental factors all influence how long these chemicals remain effective, but most homeowners can expect 5-12 years of protection before retreatment becomes necessary. At Biggins Exterminating, we carefully select the right termiticide based on your specific property conditions to maximize effectiveness.
Physical Barriers—Non-Chemical Protection
For homeowners concerned about chemical use or seeking longer-lasting solutions, physical termite barrier treatments offer compelling advantages:
Micromesh barriers made from marine-grade stainless steel provide exceptional protection. With apertures no larger than 0.018 inches (roughly 1/55th of an inch), these barriers physically prevent termites from passing through. While most effective when installed during construction, they can also be retrofitted as “collars” around pipes and other foundation penetrations. The durability is impressive—some manufacturers offer warranties up to 50 years.
Particle barriers using precisely sized sand or crushed stone have been protecting structures for over 60 years, particularly in Australia and Pacific Rim countries where termite pressure is intense. The beauty of this approach is its simplicity and longevity—termites simply cannot move the particles to create tunnels.
Borate-treated wood, while not a barrier in the traditional sense, creates a toxic zone within the lumber itself. When termites attempt to feed on this wood, they ingest the borate compound and die. This approach works wonderfully when incorporated during construction but has limitations for existing structures.
The primary advantage of physical barriers is their exceptional longevity—many come with warranties of 20-50 years, far outlasting chemical treatments. However, they’re generally easier to incorporate during new construction and can be challenging (though not impossible) to retrofit in existing homes.
| Barrier Type | Pros | Cons | Best For |
|---|---|---|---|
| Chemical | – Relatively affordable – Can be applied post-construction – Kills termites and colony – Invisible once installed |
– Requires reapplication (5-12 years) – May leach in heavy rainfall – Environmental considerations |
Existing homes, immediate protection needs |
| Physical | – Extremely long-lasting (20-50+ years) – No chemicals – One-time installation |
– Higher initial cost – Difficult to retrofit – Requires perfect installation |
New construction, long-term protection |
| Bait | – Low environmental impact – Eliminates colonies – No trenching around home |
– Requires ongoing monitoring – Slower to establish protection – Recurring costs |
Environmentally sensitive areas, homes with complex foundations |
Every home is unique, which is why we offer free inspections to determine which termite barrier treatment will provide the most effective protection for your specific situation and budget. Learn more about our Termite Pest Control options to keep your biggest investment safe from these silent destroyers.
Pre-Construction vs Post-Construction Termite Barrier Treatment
When it comes to protecting your home from termites, timing is everything. The stage at which you install a termite barrier treatment affects not only the methods available but also how comprehensive your protection will be.
Pre-Construction Termite Barrier Treatment Essentials
There’s no better time to think about termite protection than when your home is still being built. Pre-construction barriers offer the most thorough protection because they can be integrated into the very structure of your home.
During the building process, contractors can apply horizontal soil treatments before pouring the concrete slab. This creates a complete chemical barrier beneath your entire home – something that’s impossible to achieve once construction is finished.
Under-slab membranes are another powerful option available only during construction. These physical barriers prevent termites from entering through the foundation, while special termite collars can be installed around plumbing pipes and other penetrations that would otherwise create vulnerable entry points.
Many building codes, including some in Massachusetts, now require pre-construction termite barrier treatments. These requirements often follow international standards like Australia’s AS3660, which has become something of a gold standard in termite protection globally.
As one of our termite specialists at Biggins often says, “The best time to stop termites is before they have a house to eat.” By incorporating protection during the building phase, you’re creating a fortress against these destructive pests from day one.
Post-Construction Termite Barrier Treatment Options
Don’t worry if your home is already built – you still have excellent options for creating an effective termite barrier treatment. The approaches just look a little different.
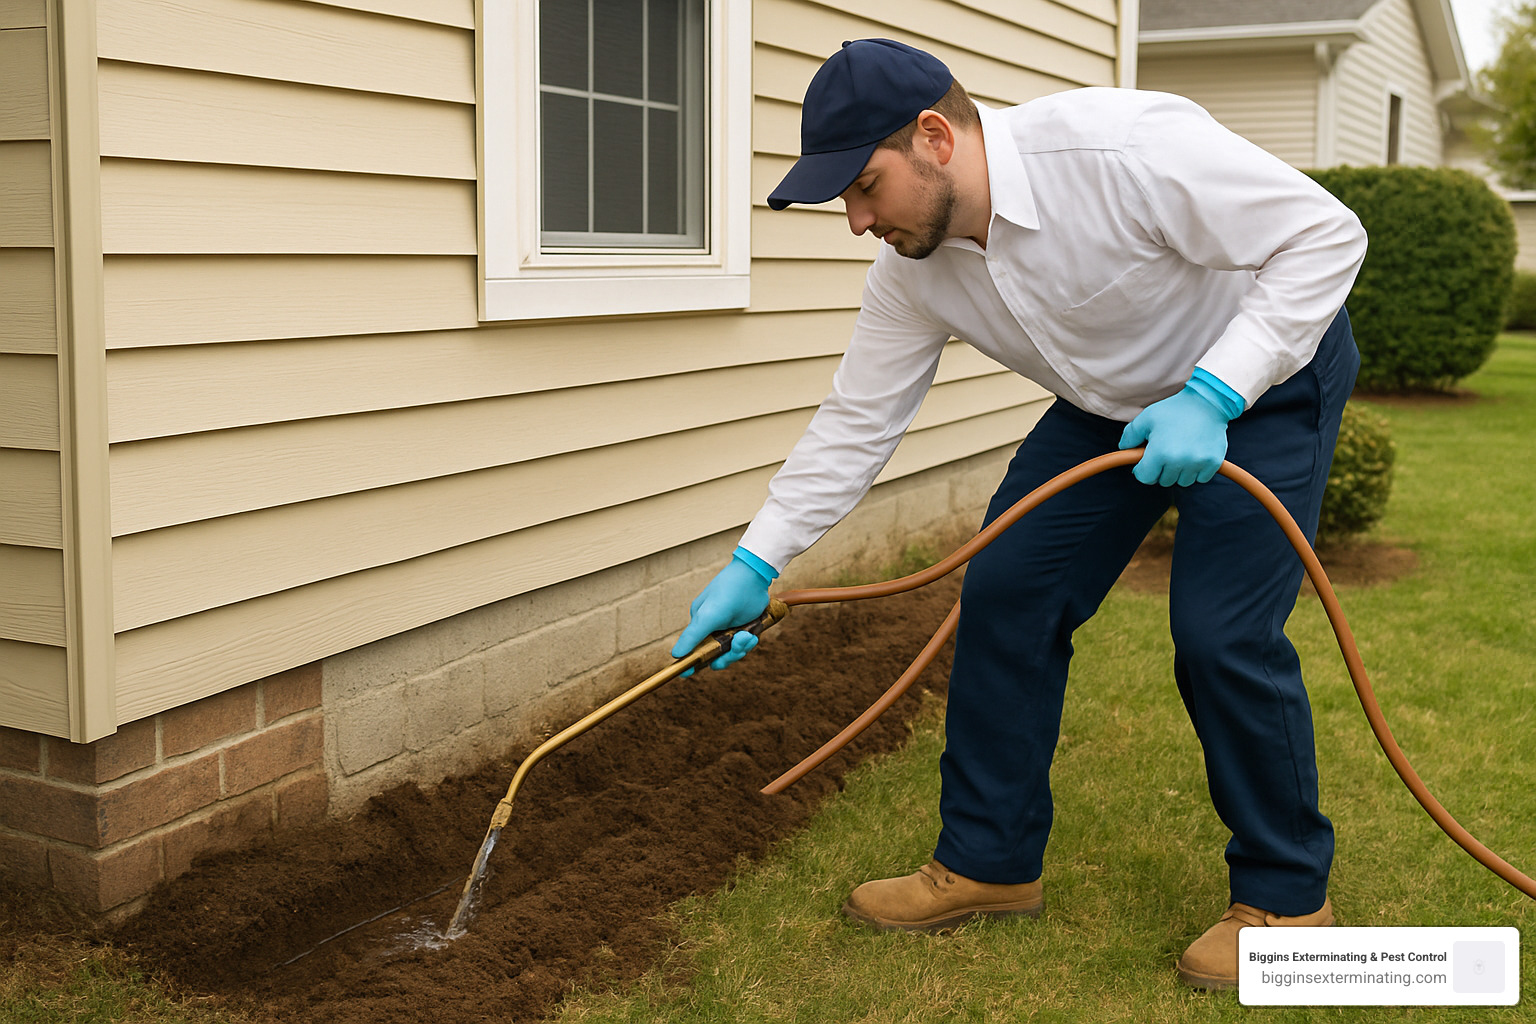
For existing homes, trenching is the most common method. This involves digging a narrow trench (typically 6 inches deep by 6 inches wide) around your foundation’s perimeter. Technicians then apply termiticide to this trench before carefully mixing the soil and backfilling. This creates a continuous chemical barrier that termites can’t detect but can’t survive crossing.
In areas with concrete slabs or where trenching isn’t possible, we use precision drilling. Small holes are drilled through concrete at intervals of about 200 mm (8 inches), allowing us to inject termiticide beneath the slab. Don’t worry – these holes are neatly patched afterward!
Some homeowners opt for reticulation systems – networks of perforated tubes installed around the foundation that allow for periodic reapplication of termiticide without additional digging or drilling. These systems make maintenance much easier over the years.
Many post-construction barriers come with warranty options, though these typically require annual inspections to remain valid – a small price to pay for peace of mind.
At Biggins Exterminating, we’ve installed post-construction barriers in thousands of Massachusetts homes over our 40+ years in business. While pre-construction is ideal, we’ve developed specialized techniques to ensure even existing homes receive thorough protection. The key is working with professionals who understand the unique challenges of retrofitting these protective systems.
Longevity, Cost & Safety of Termite Barrier Treatments
When you invest in a termite barrier treatment, you’re not just buying pest control – you’re buying peace of mind. But how long will that peace of mind last, what will it cost you, and is it safe for your family? Let’s break it down in terms every homeowner can understand.
Longevity Factors
Not all termite barrier treatments offer the same protection timeline. Chemical barriers typically protect your home for 5-12 years before needing reapplication. The exact lifespan depends on several factors – your soil type makes a big difference (clay holds chemicals longer than sand), as does your local rainfall (heavy rain can reduce effectiveness). Even the specific termiticide used affects longevity.
Physical barriers are the marathon runners of termite protection, often lasting 20-50+ years when properly installed. Some manufacturers are so confident in their products that they offer lifetime warranties – now that’s standing behind your work!
Bait systems march to a different drummer. While they can provide excellent protection, they require ongoing attention. Think of them like a subscription service rather than a one-time purchase, with regular monitoring and bait replacement needed to maintain your protective shield.
Cost Considerations
“How much will this set me back?” It’s the question on every homeowner’s mind. Based on internet data (not Biggins Exterminating pricing), here’s what you might expect to pay:
For chemical soil barriers, most homes fall in the $1,800-$6,000 range. Your final bill depends on your home’s size, foundation type, and the specific challenges your property presents. A sprawling ranch home with multiple foundation types will naturally cost more than a simple rectangular slab.
Physical barriers tend to run higher – typically $2,500-$8,000 for new construction installation. Retrofitting existing homes can push that price considerably higher, as there’s more labor involved in working around established structures.
Bait systems usually require $1,500-$5,000 for initial setup, plus ongoing monitoring fees that might range from $300-$1,000 yearly. These are general ranges based on internet research, not specific pricing for our services at Biggins Exterminating.
Safety Profile
“But is it safe for my kids and pets?” It’s perhaps the most important question, and I’m happy to report that modern termite barrier treatments have excellent safety profiles when properly applied.
Today’s termiticides undergo rigorous testing – more than 100 studies per product – before the EPA grants approval. These aren’t the harsh chemicals of yesteryear. Many modern options, like fipronil, have such low mammalian toxicity that similar formulations are used directly on dogs and cats for flea control. For more detailed information about fipronil safety, you can review the general fact sheet on fipronil from the National Pesticide Information Center.
Most liquid termiticides bond tightly with soil particles once applied, limiting their movement through the soil and reducing environmental impact. And reentry times after application are surprisingly brief – often just a few hours until the treatment dries.
At Biggins Exterminating, safety isn’t just a buzzword – it’s our priority in every termite barrier treatment we perform. We use only EPA-approved products and follow application protocols to the letter to ensure your family’s wellbeing.
Factors That Shorten Barrier Life
Even the best termite barrier treatment can be compromised by certain activities. Knowing these risk factors helps you protect your investment:
Soil disturbance is the number one culprit. That weekend gardening project where you dug along the foundation? It might have created a gap in your chemical barrier. Major landscaping, trenching for utilities, or even enthusiastic kids digging can all compromise your protection.
Water issues present another challenge. Poor drainage that creates puddles along your foundation can dilute or wash away termiticides. Similarly, flooding events can impact your barrier’s integrity, though some modern products show impressive resilience to water exposure.
Home additions without proper barrier extension create vulnerable points for termite entry. That new deck or porch needs the same level of protection as your original structure.
DIY landscaping near your foundation can inadvertently create termite highways into your home. As one of our technicians often tells customers, “That beautiful flower bed along your foundation might be inviting termites to dinner – and your house is on the menu.”
Are Termite Barrier Treatments Safe?
I understand the concern about applying chemicals around your home – it’s something many of our customers in Wilmington and surrounding Massachusetts communities ask about.
Modern termite barrier treatments have come a long way from the harsh chemicals used decades ago. Today’s options are designed with safety in mind, using targeted approaches that affect termites while posing minimal risk to humans and pets when used correctly.
The EPA’s stringent testing requirements mean that every registered termiticide has passed numerous safety assessments. Products like fipronil carry the EPA’s lowest hazard classification of “Caution” – a far cry from the “Danger” or “Warning” labels of older generation treatments.
When applied by trained professionals following label instructions, chemical barriers become integrated with the soil, creating a zone that’s toxic to termites but presents minimal exposure risk to your family once dried. The termiticide bonds with soil particles, staying put rather than migrating to places it shouldn’t be.
Still concerned? Physical barriers or bait systems offer effective alternatives with even lower risk profiles. At Biggins Exterminating, we’re happy to discuss all your options and help you find the right balance of effectiveness, longevity, and safety for your specific situation. You can learn more about termite risks in our region by reading about The Dangers of Termites and How to Prevent Them in Massachusetts.
Step-By-Step Guide to Installing a Chemical Soil Barrier (DIY or Pro)
There’s something deeply satisfying about seeing a proper termite barrier treatment installation unfold. While we at Biggins Exterminating strongly recommend leaving this job to professionals (more on why later), understanding what goes into the process helps you appreciate the thoroughness required to truly protect your home.
1. Thorough Inspection
Every effective termite barrier treatment begins with a comprehensive inspection. This isn’t just a quick walk-around—it’s a methodical examination of your property.
A proper inspection identifies termite activity hiding in plain sight, like mud tubes running up foundation walls or damaged wood with that distinctive “hollowed out” appearance. Just as important is spotting conditions that attract termites: excess moisture around foundations, wood debris touching soil, or improper drainage patterns.
“The inspection phase is where experience really matters,” explains our technician Mike, who’s been installing barriers for over 15 years. “I’ve found active termite colonies in places homeowners had walked past hundreds of times without noticing.”
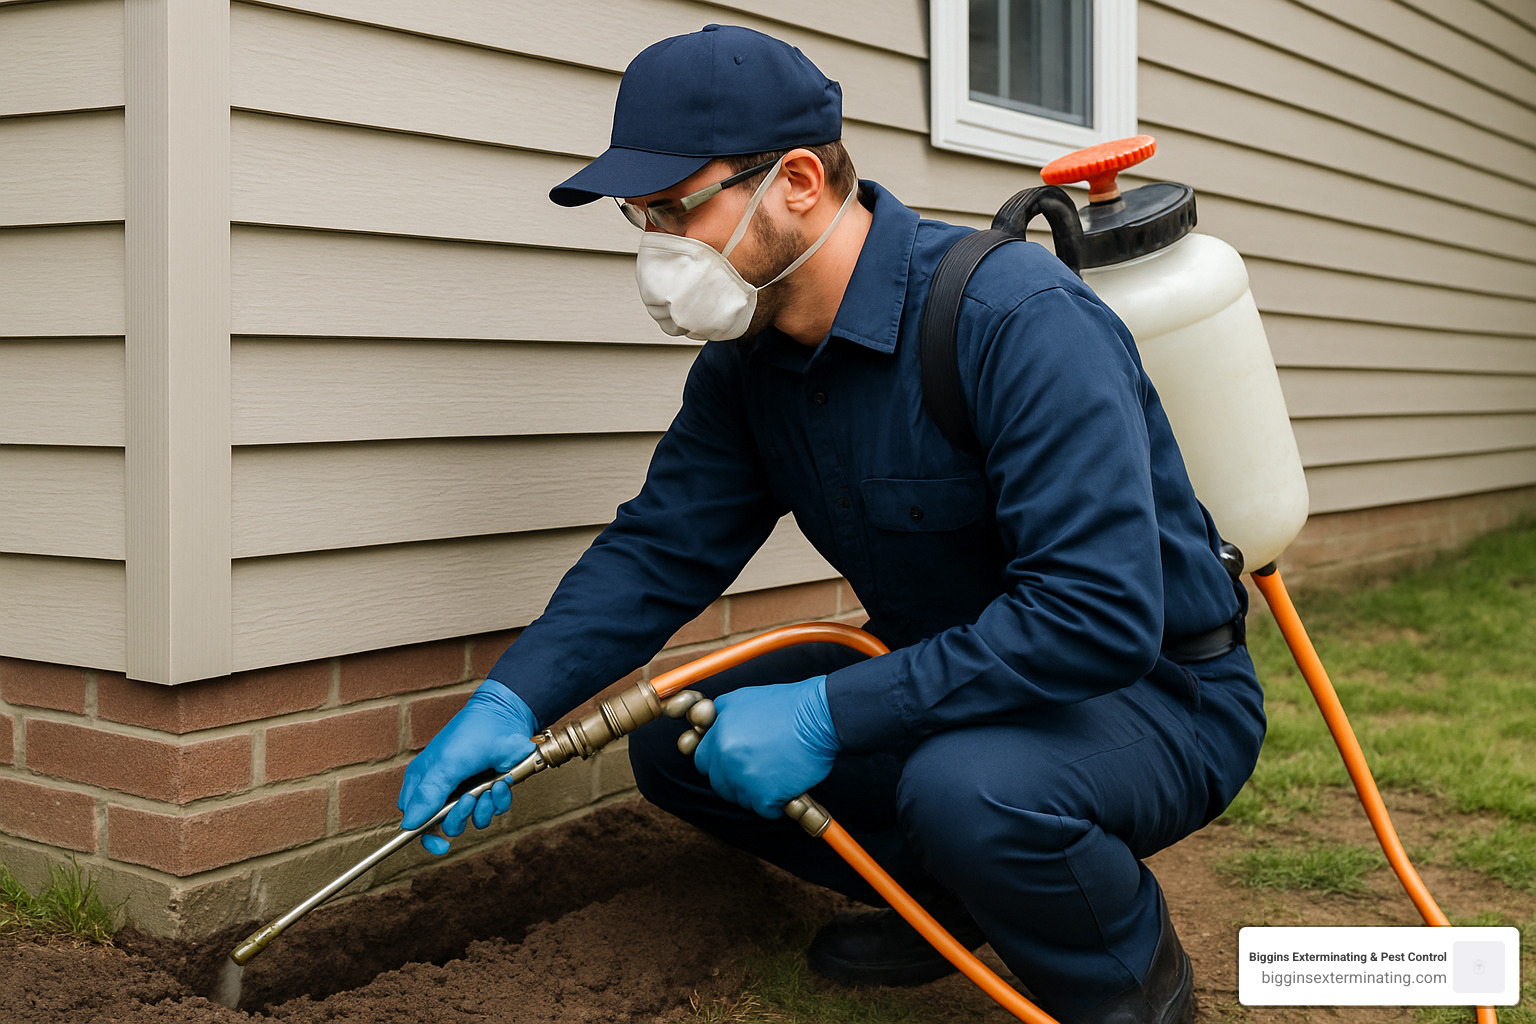
2. Preparation and Safety Measures
Before the first drop of termiticide touches soil, substantial preparation ensures safety and effectiveness. This includes calling 811 to mark underground utilities—a step many DIYers unfortunately skip. We temporarily shut off HVAC systems to prevent drawing chemical vapors indoors and secure the area to keep children and pets safely away.
Safety gear isn’t optional—chemical-resistant gloves, eye protection, and appropriate clothing protect the applicator throughout the process. We take these precautions seriously because while modern termiticides are safer than ever, they’re still powerful pest control chemicals deserving respect.
3. Trenching Process
Now comes the real work. A proper termite barrier treatment requires digging a trench approximately 6 inches deep by 6 inches wide along your entire foundation perimeter. This isn’t just about digging a hole—it’s about creating a continuous channel without gaps that could serve as termite highways into your home.
The trench must reach the top of your foundation footing where possible, creating a complete protective zone. In areas with rocky soil (common in parts of Massachusetts), this can be challenging work requiring experience and persistence.
4. Termiticide Preparation
Mixing termiticide sounds simple but requires precision. Using clean water within the specific pH range mentioned on the product label, we measure carefully to achieve the exact concentration required—typically 0.06% for fipronil-based products.
This isn’t the place for guesswork or “eyeballing” measurements. Even small mixing errors can reduce effectiveness or potentially increase risks. Professional applicators use calibrated equipment and mix only what’s needed for immediate application.
5. Application Techniques
With trenches dug and termiticide properly mixed, application begins. The standard rate for most termite barrier treatments is 4 gallons of diluted termiticide per 10 linear feet per foot of depth.
As we treat the soil, we ensure even distribution throughout. One technique that separates professionals from DIYers is treating the soil as it’s being replaced in the trench, mixing thoroughly to create a complete barrier without gaps.
6. Slab Injection (When Needed)
For homes built on concrete slabs, we drill small holes approximately 8 inches apart along the entire perimeter. Special attention goes to expansion joints and visible cracks—termites love exploiting these vulnerabilities.
Using specialized injection equipment, termiticide is precisely delivered beneath the slab, creating a continuous barrier. Afterward, we carefully seal all drill holes with concrete patch, leaving minimal evidence of the work completed.
7. Post-Application Procedures
A professional termite barrier treatment doesn’t end when the chemical is applied. We carefully clean all equipment to prevent contamination, properly dispose of any excess termiticide according to environmental regulations, and document every detail of the application for warranty purposes.
Before leaving, we provide clear instructions about post-treatment precautions, like not disturbing the treated soil and avoiding power-washing near the foundation, which could compromise the barrier’s effectiveness.
Tools & Materials Checklist
For those still considering the DIY route (though we hope we’ve convinced you otherwise), you’ll need specific equipment: a professional-grade sprayer or 5-gallon bucket for mixing, a trenching spade, concrete drill with masonry bits for slab homes, and proper PPE including chemical-resistant gloves and eye protection. Materials include EPA-registered termiticide, clean water for mixing, concrete patch for sealing drill holes, and documentation materials.
The expense of purchasing all these items for a one-time use often approaches the cost difference between DIY and professional application—without the expertise or warranty protection.
When to Call a Pro for Termite Barrier Treatment
There are several situations where professional installation is particularly crucial:
Complex foundations present unique challenges requiring specialized knowledge. Homes with multiple foundation types, additions, or unusual features need an experienced eye to ensure complete protection without gaps.
Active infestations demand a coordinated approach. When termites are already munching away, professionals can eliminate existing colonies while simultaneously installing your barrier, addressing both immediate and long-term protection.
Warranty protection provides peace of mind. DIY applications typically come with zero guarantees, while professional installations often include warranties of 5-10 years—real insurance for your investment.
Equipment access makes a difference. Professionals use commercial-grade equipment and often have access to higher-concentration formulations not available to consumers.
At Biggins Exterminating & Pest Control, our 40+ years serving Wilmington and surrounding Massachusetts communities means we’ve encountered virtually every foundation type and termite scenario imaginable. This experience translates directly to more effective termite barrier treatments with fewer complications and better long-term results. For more information about professional pest control services, visit our page on The Importance of Hiring a Professional Pest Control Service in Massachusetts.
Maintaining & Inspecting Your Barrier for Peak Performance
A termite barrier treatment is like a protective shield around your home – but even the best shields need regular maintenance. Think of it as similar to changing the oil in your car – a little preventative care goes a long way toward avoiding major problems.
Regular Inspection Schedule
Your termite barrier isn’t a “set it and forget it” solution. To keep your home properly protected, schedule professional inspections at least once a year. Spring is ideal timing since termite activity naturally increases as temperatures warm up.
“I always tell my customers to think of termite inspections like dental checkups – much better to catch small problems early,” says Stephen Biggins, owner of Biggins Exterminating & Pest Control.
Keep detailed records of each inspection for warranty purposes. Many manufacturers and service providers require documentation of regular maintenance to honor warranties. The Building Code of Australia recommends inspections no more than 12 months apart – a standard that pest control professionals worldwide have adopted as best practice.
Moisture Management
Termites and moisture go together like peanut butter and jelly – except this is one sandwich you definitely don’t want in your home! Moisture management is critical to maintaining your termite barrier treatment.
Fix leaking pipes, faucets, and AC units promptly. Water that pools around your foundation can compromise chemical barriers and create perfect conditions for termite activity. Keep your gutters clean and ensure downspouts direct water at least 5-10 feet away from your foundation.
Proper ventilation in crawl spaces and attics helps prevent the humidity that termites love. Consider installing vapor barriers in crawl spaces if moisture is a persistent issue in your Massachusetts home.
Landscape Considerations
That beautiful garden or new deck could inadvertently create gaps in your termite protection. Avoid digging near the foundation that might disturb chemical barriers – even something as simple as planting flowers can potentially create a pathway for termites.
Maintain at least 6 inches of clearance between soil and wooden structural elements of your home. Keep mulch pulled back several inches from your foundation or consider switching to termite-resistant alternatives like rubber mulch or river rock in areas adjacent to your home.
Don’t forget to remove tree stumps and wood debris from your property. These can serve as termite buffets and stepping stones to your home, even with a termite barrier treatment in place.
Re-treatment Timing
Even the most effective termite barriers don’t last forever. Mark your calendar for retreatment based on the product’s expected lifespan – typically 5-12 years for chemical barriers. Consider early retreatment if significant soil disturbance or flooding has occurred near your home.
Keep an ear open for increased termite activity in your neighborhood. If neighbors are experiencing termite problems, it might indicate higher termite pressure that could test your barrier sooner than expected.
At Biggins Exterminating & Pest Control, we help homeowners throughout Wilmington, Andover, Bedford and surrounding Massachusetts communities maintain their termite barrier treatments with scheduled inspections and timely retreatment recommendations. Learn more about the importance of regular inspections by reading our article on The Importance of Regular Pest Inspections: Safeguarding Your Home and Health.
Signs Your Barrier May Have Failed
Even with proper maintenance, barriers can eventually be compromised. Knowing the warning signs can save you thousands in potential damage:
Mud tubes crossing the barrier are like termite highways – pencil-width tunnels built by subterranean termites to cross exposed areas. Finding these crossing your foundation is a clear sign termites have found a way around your protection.
Swarmers inside your home spell trouble. These winged reproductive termites or their shed wings indoors suggest an active infestation has bypassed your barrier. They typically emerge in spring or early summer in Massachusetts.
Fresh wood damage, especially near your foundation, may indicate termites have breached your defenses. Tap suspicious wood – a hollow sound could indicate termites have been feasting from within.
Changes in bait station activity can provide early warning. If you have supplemental monitoring stations and notice increased or new activity, termites may be testing your perimeter protection.
Visible soil disturbance from erosion, construction, or landscaping might have created gaps in your chemical barrier. Even seemingly minor changes to the soil around your foundation can impact protection.
If you spot any of these warning signs, don’t wait! Contact a professional immediately for inspection. The sooner a barrier failure is detected, the less damage termites can cause to your home.
Frequently Asked Questions about Termite Barrier Treatments
How long does a termite barrier treatment last?
When homeowners invest in a termite barrier treatment, one of their first questions is almost always about longevity. The truth is, protection duration varies significantly depending on which system you choose.
Chemical barriers typically provide protection for 5-12 years. Several factors influence exactly how long your chemical barrier remains effective. The active ingredient makes a big difference—fipronil-based products like Termidor generally outlast alternatives in most conditions. Your soil type plays a major role too, with clay soils holding onto the chemicals longer than sandy soils that allow more leaching. Environmental conditions like heavy rainfall, extreme temperatures, and even soil pH can accelerate breakdown of the termiticide. And of course, the quality of the initial application is crucial—this is why professional installation makes such a difference.
Physical barriers are the marathon runners of termite protection, often lasting 20-50+ years when properly installed. Stainless steel mesh doesn’t degrade over time the way chemicals do, and properly sized particle barriers maintain their effectiveness for decades. Many manufacturers of physical barriers confidently offer warranties spanning 25 years or even lifetime guarantees.
Bait systems work differently. The stations themselves last for many years, but the bait inside needs regular checking and replacement—typically every few months. Think of bait systems as requiring ongoing maintenance rather than having a fixed lifespan.
For any barrier type, we strongly recommend annual professional inspections. Even the longest-lasting barriers benefit from expert eyes checking for any issues that might compromise their effectiveness.
Can I install a termite barrier myself?
While the hardware store shelves might suggest DIY termite control is straightforward, installing a complete termite barrier treatment yourself comes with significant challenges.
First, proper installation requires specialized equipment most homeowners simply don’t have in their garage. Professional-grade trenchers, concrete drills with proper bits, calibrated sprayers, and soil injection rods are all essential for proper application. Trying to substitute with standard gardening tools often leads to incomplete coverage.
Access to effective products is another major hurdle. The most powerful professional-grade termiticides are typically not available to consumers, or they’re only sold in diluted formulations that don’t provide the same level of protection. This means even if you master the application technique, you might be working with less effective materials.
Perhaps most importantly, DIY applications come without professional warranties. When a licensed pest control company installs your termite barrier treatment, they typically provide a warranty covering both retreatment and sometimes even damage repair if termites breach the barrier. This peace of mind is impossible to replicate with a DIY approach.
Safety considerations shouldn’t be overlooked either. Professional applicators receive extensive training on proper mixing, handling, and application of termiticides to ensure family, pet, and environmental safety. They understand the proper personal protective equipment needed and how to prevent contamination of water sources.
Complete coverage is where many DIY attempts fall short. Professional installers understand how to address complex foundation details, utility penetrations, and construction features that create potential entry points. They know how to customize the application for your specific home construction.
For these reasons, we generally recommend professional installation for termite barrier treatments. The investment typically pays dividends through more effective, longer-lasting protection and valuable warranty coverage.
What happens if termites breach the barrier?
Even the best termite barrier treatments occasionally face determined termites that find a way through. If this happens, several responses typically follow:
Warranty coverage is your first line of defense against financial impact. Most professional barrier installations come with warranties that cover retreatment if termites breach the barrier during the warranty period. At Biggins Exterminating, we stand behind our work with comprehensive warranty coverage. Some warranties also include provisions for damage repair, which can save homeowners thousands if structural repairs become necessary.
The immediate priority becomes colony elimination. Once termites are detected inside the protected zone, targeted treatments are deployed to eliminate the invading colony. This might involve direct wood treatments, localized soil treatments, or supplemental bait stations depending on the situation.
Next comes barrier reinforcement. Our technicians will identify how and where termites breached the barrier and reinforce that section. Sometimes this involves additional trenching and treatment, while other situations might require drilling and injecting termiticide beneath slabs or into wall voids.
A thorough damage assessment is essential to determine if any structural repairs are needed. Our inspectors carefully examine all wooden elements near the breach point, looking for damage that might compromise structural integrity.
At Biggins Exterminating & Pest Control, we’ve spent over 40 years protecting homes throughout Wilmington, Burlington, Bedford, and surrounding Massachusetts communities. This experience means we’ve seen virtually every termite scenario possible and developed effective response protocols that quickly address barrier breaches before significant damage occurs.
Remember—the earlier a breach is detected, the less damage termites can cause. This is why annual professional inspections remain important even with the best barrier systems in place.
Conclusion
Termite barrier treatments represent the most comprehensive approach to protecting your home from these destructive pests. Whether you choose a chemical soil treatment, physical barrier, or bait system, the key is creating a complete defensive perimeter that termites cannot cross undetected or unharmed.
The investment in a quality barrier system pays dividends in both peace of mind and protection of your home’s structural integrity. With termites causing billions in damage annually and most insurance policies excluding this damage, preventative protection is simply smart homeownership.
For Massachusetts homeowners in Wilmington, Andover, Bedford, Billerica, Burlington, Lexington, North Reading, Tewksbury, and Woburn, Biggins Exterminating & Pest Control brings over four decades of local termite control expertise to every termite barrier treatment we install. Our family-owned business understands the unique challenges of New England homes and soils, allowing us to tailor barrier solutions to your specific property.
Even the best barriers require periodic inspection and maintenance. Annual professional inspections, maintaining proper drainage and moisture control, and being alert to signs of termite activity all contribute to long-term protection success.
Don’t wait until you see evidence of termites to act. By then, damage may already be significant. Contact us today to discuss how a professionally installed termite barrier treatment can protect your most valuable investment for years to come.
