The Buzz About Protecting Your Home’s Exterior
Carpenter bees wood siding issues are a common headache for homeowners, especially during spring and summer months. If you’re looking to protect your wood siding from these persistent pollinators, here’s what you need to know:
Quick Protection Guide for Wood Siding:
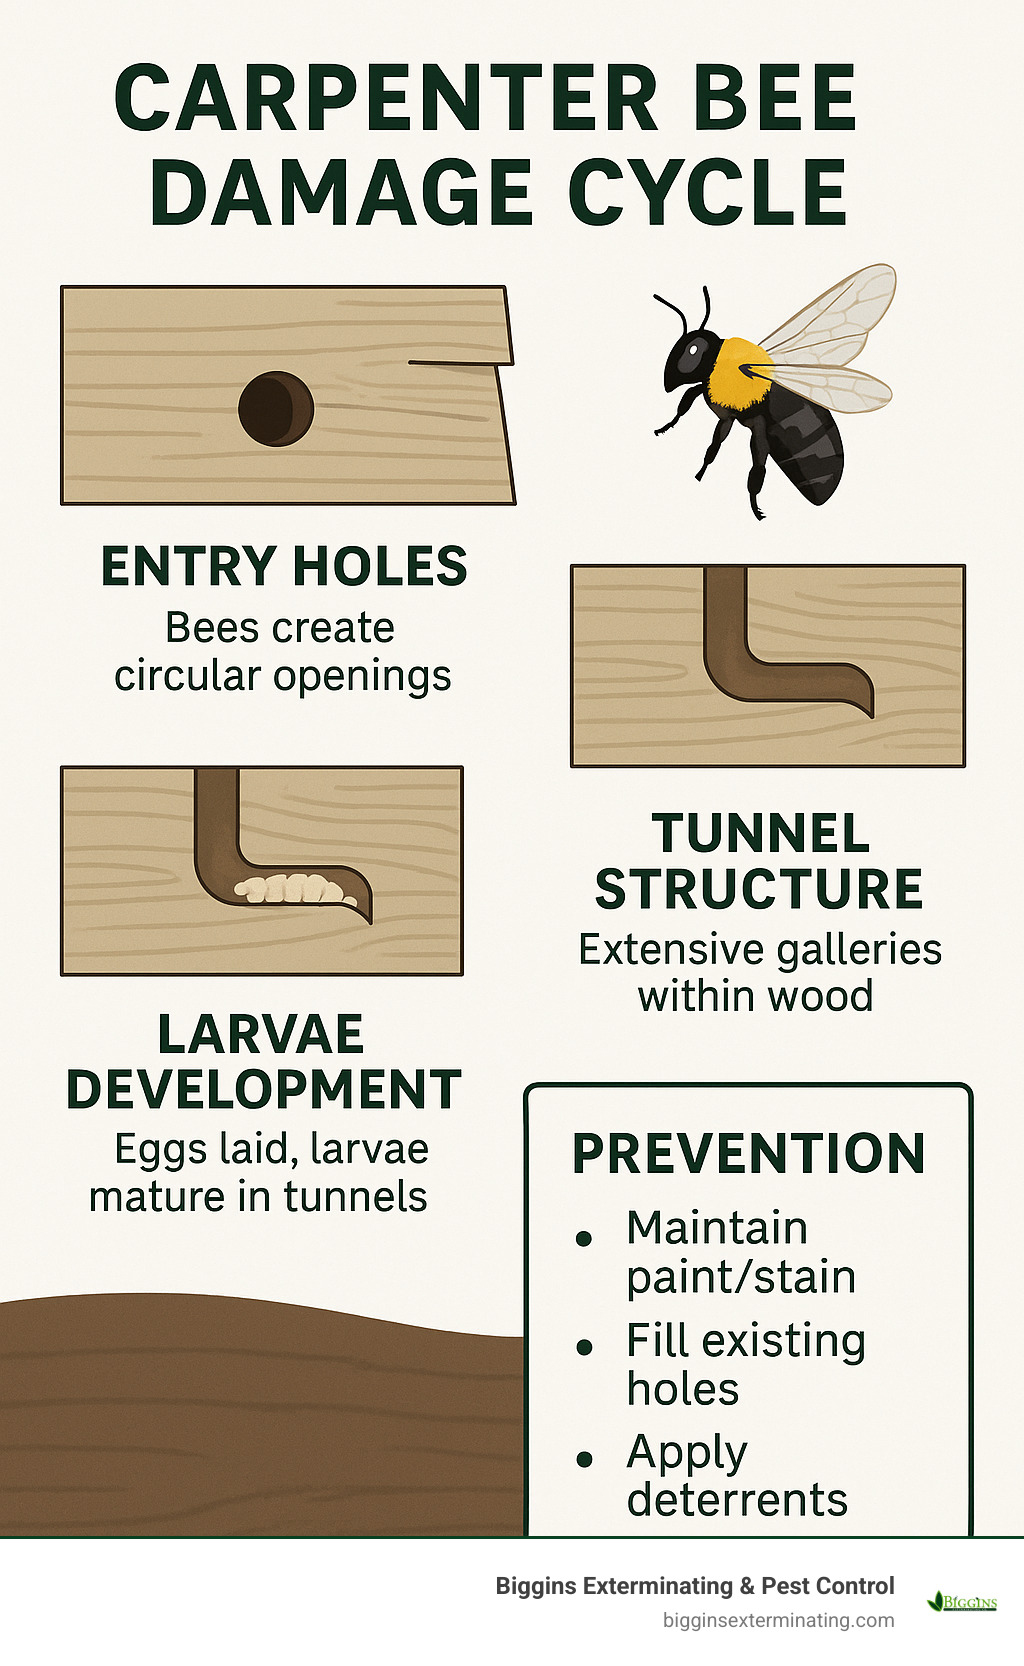
– Maintain paint/stain: Keep wood surfaces sealed and finished
– Fill existing holes: Use wood putty or dowels, then paint
– Apply deterrents: Citrus or almond oil sprays repel bees
– Create vibration: Wind chimes near affected areas deter nesting
– Consider materials: Fiber cement siding resists carpenter bee damage
When spring arrives and you notice large black and yellow bees hovering around your home’s exterior, perfectly round half-inch holes appearing in your wood siding, or small piles of sawdust collecting below, you’re likely dealing with carpenter bees. Unlike termites, carpenter bees don’t eat wood—they excavate it, creating extensive tunnel networks for nesting that can extend up to 10 feet long when reused over several seasons.
While these important pollinators contribute to approximately 15% of U.S. agricultural pollination, their nesting habits can significantly compromise your home’s structural integrity over time. Left untreated, carpenter bee galleries can lead to moisture infiltration, mold growth, and even attract woodpeckers that cause additional damage as they hunt for bee larvae.
I’m Stephen Biggins, owner of Biggins Exterminating Co., and I’ve been helping homeowners protect their carpenter bees wood siding problems for over four decades in Wilmington, MA and surrounding areas. My team specializes in effective, eco-conscious solutions that balance protecting your property while respecting these valuable native pollinators.
Handy carpenter bees wood siding terms:
– carpenter bees control
– how to get rid of wood boring bees
Understanding Carpenter Bees & Wood Siding
When it comes to carpenter bees wood siding issues, we’re looking at a fascinating yet potentially problematic relationship. Unlike their social cousins that buzz around in colonies, carpenter bees are the lone wolves of the bee world. The female does all the heavy lifting—drilling those perfectly round half-inch holes you might spot along your home’s exterior.
You can easily identify these wood-boring visitors by their distinctive shiny, hairless black abdomens—quite different from the fuzzy, teddy-bear-like bumblebees they’re often mistaken for. And here’s a fun fact: those intimidating male bees that seem to dive-bomb you near their nests? All bark, no sting! Males lack stingers entirely. Females can sting but rarely do unless you’re literally grabbing them (which I don’t recommend!).
What makes carpenter bees particularly challenging for homeowners is their impressive carpentry skills. What starts as a modest 6-12 inch tunnel can, over several seasons, become an elaborate gallery system stretching an astonishing 6-10 feet through your siding and structural wood. Talk about unwanted home renovations!
These bees aren’t equal opportunity drillers—they’re surprisingly picky about their wood choices. They strongly prefer softwoods like pine, cedar, cypress, and redwood. And they absolutely love unfinished, weathered, or raw wood surfaces. This is why a fresh coat of paint is one of your best defenses against these persistent pollinators.
Carpenter Bees vs. Bumblebees & Honeybees
“Is that a carpenter bee or something else?” It’s a common question we hear at Biggins Exterminating. Here’s your quick field guide:
Carpenter bees sport that distinctive shiny, hairless black abdomen, live solitary lives, drill perfect half-inch holes in wood, and while males may seem aggressive as they patrol their territory, they’re all show—no stinger! Females rarely sting unless directly threatened.
Bumblebees have entirely fuzzy bodies (including their abdomens), live socially in colonies, prefer ground nests in abandoned rodent burrows, and generally mind their own business unless their nest is disturbed.
Honeybees are smaller with slender bodies and light brown coloring, highly social with complex hive structures, never drill into wood, and are busy producing honey and beeswax.
This distinction matters because the treatment approaches differ significantly. While a honeybee situation might require a beekeeper’s touch, carpenter bees wood siding problems need targeted treatments and preventative strategies.
Why Do Carpenter Bees Target Wood Siding? (carpenter bees wood siding)
Your home isn’t randomly selected for carpenter bee renovations. These savvy insects have specific preferences that make certain wood siding particularly attractive.
They love sunny exposures, especially south and east-facing walls that warm up early in the day. The wood grain direction matters too—horizontal siding provides an ideal drilling orientation where they can bore in about an inch before turning to follow the grain with less effort.
Weathered paint creates the perfect opportunity, as peeling, cracking, or thinning areas expose raw wood and create ideal entry points. They also prefer wood with slight moisture gradients—not soaking wet, but not bone-dry either.
Like many of us, carpenter bees are creatures of habit. They’ll return to previously successful nesting locations year after year if allowed. The seams between clapboard or shiplap siding provide natural starting points for their tunneling operations.
In our 40+ years serving communities throughout Massachusetts, we’ve consistently observed that homes with weathered cedar siding or unpainted trim become particularly vulnerable to carpenter bee activity.
Life Cycle & Seasonal Damage Timeline
Understanding when and how carpenter bees operate helps you plan your defense strategy:
Spring (April-May) brings the emergence of overwintered adults, followed by mating season. Males patrol territory while females begin the serious work of excavating new tunnels or renovating old ones.
By Late Spring/Early Summer (May-June), females create brood chambers within these tunnels, typically laying about 6-8 eggs. Each egg gets its own private chamber stocked with pollen and nectar provisions—a regular bee nursery.
Summer (June-August) is development time, with larvae growing within their chambers before pupating. New adults emerge after approximately seven weeks, and you might notice fresh sawdust appearing as these new adults exit their childhood homes.
During Fall/Winter (September-March), new adult females find shelter in tunnels to overwinter while activity ceases during cold months. Tunnels remain either vacant or house overwintering females.
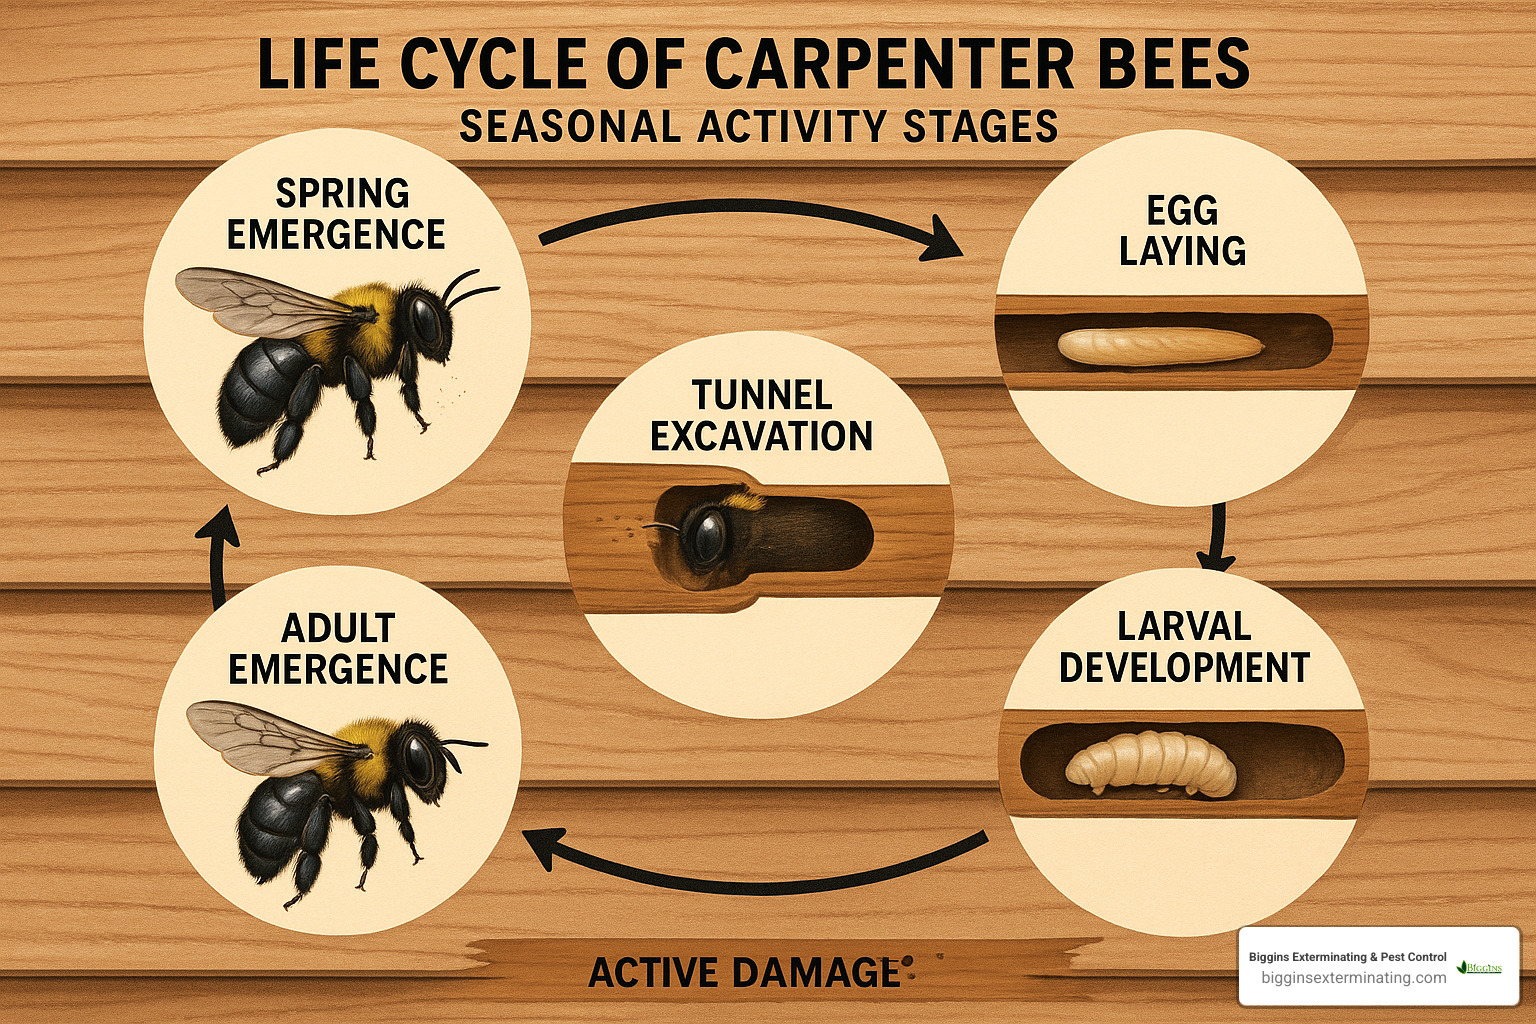
This predictable cycle creates a pattern of damage, with the most active drilling periods occurring in spring (new nest creation) and late summer (new adult emergence). By planning your inspection and treatment around these times, you’ll maximize effectiveness and minimize damage to your home’s exterior.
According to scientific research on carpenter bee life cycles, these fascinating insects contribute to about 15% of U.S. agricultural pollination, making them valuable members of our ecosystem—just not when they’re drilling into your home!
Spotting & Assessing Carpenter Bee Damage
When it comes to carpenter bees wood siding issues, catching the problem early can save you thousands in repairs. As I’ve seen countless times over my years in pest control, what starts as a few innocent-looking holes can quickly become a structural headache.
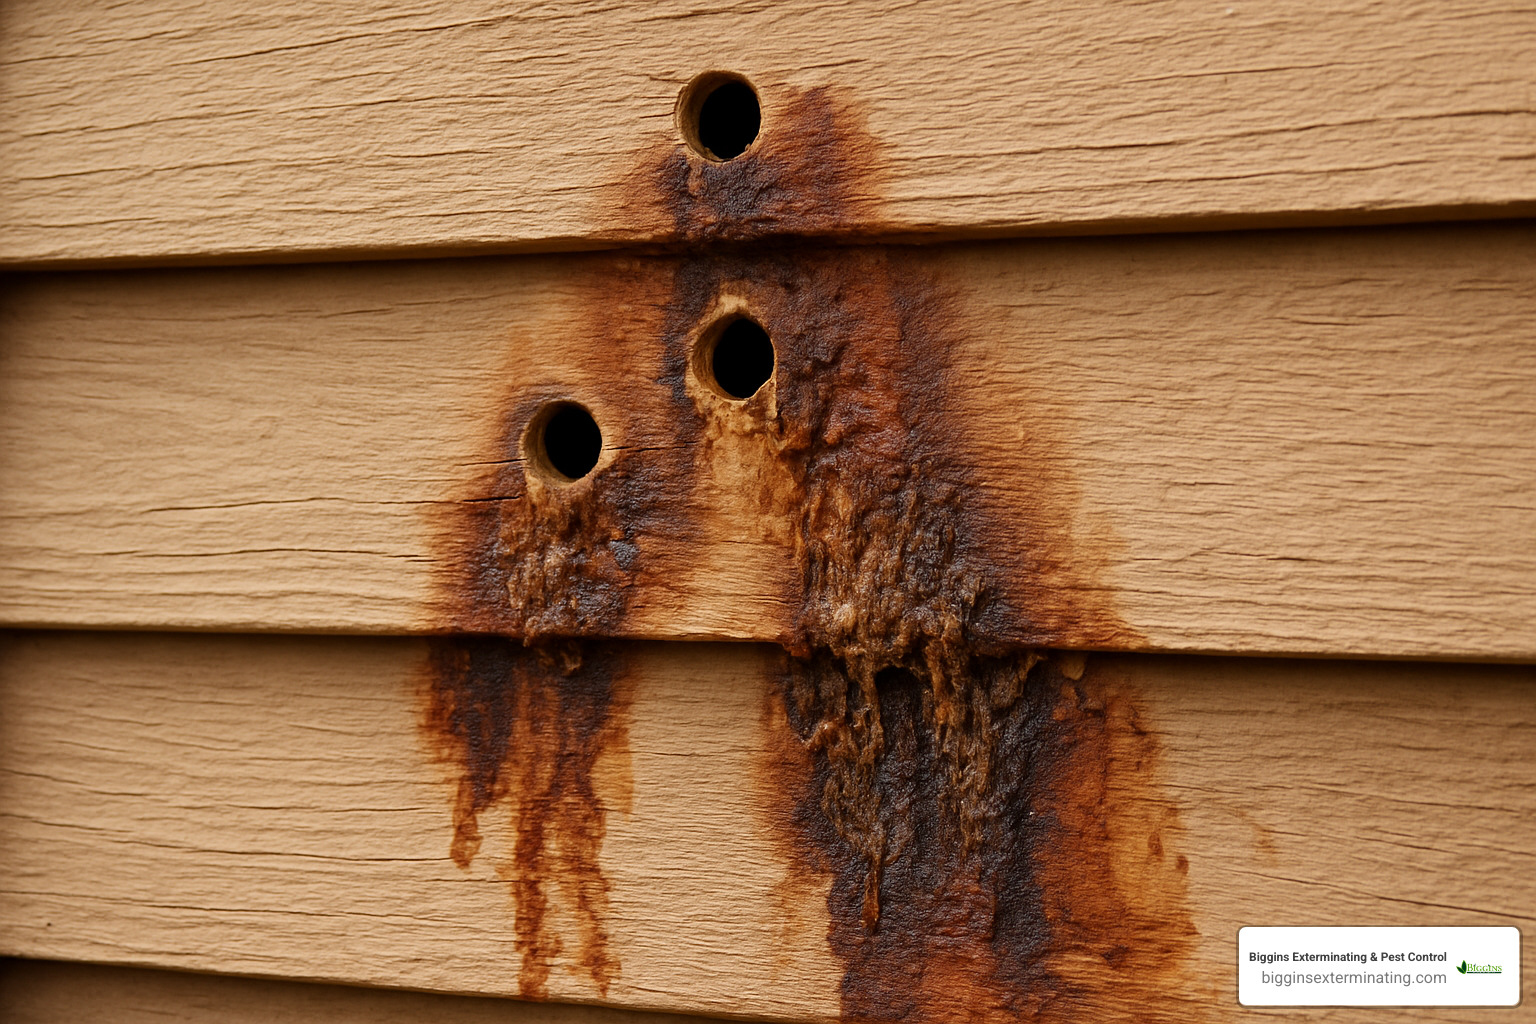
The first thing most homeowners notice is those perfectly circular entry holes – about ½-inch in diameter – that look almost machine-drilled. These aren’t random damage; they’re the careful work of female carpenter bees creating their nests. Look beneath these holes and you’ll often spot fan-shaped yellowish-brown stains – that’s bee excrement marking their regular flight path.
If you stand quietly near suspected areas, especially on warm spring mornings, you might hear the giveaway sounds: a distinct buzzing or even scraping noises as females excavate new tunnels. Another dead giveaway is small piles of sawdust (what we call “frass”) collecting directly below active holes – this is freshly excavated wood being pushed out as they work.
Telltale Entry Holes & Fresh Sawdust
The precision of carpenter bee holes is remarkable – they’re nearly perfect circles with clean edges when fresh. Older holes develop weathered edges and may show signs of previous repairs or attempts to seal them. The fresh sawdust beneath active holes is typically fine-grained and often has a greenish-brown tint when newly created.
Where you find these holes is also telling. In my four decades helping Massachusetts homeowners, I’ve found carpenter bees consistently prefer certain spots: the undersides of horizontal surfaces, fascia boards, eaves, window trim, deck railings, and especially weathered wood siding. When you spot multiple holes clustered together, you’re likely dealing with a well-established population that’s been calling your home their home for several seasons.
Secondary & Long-Term Structural Problems
The direct damage from bee tunneling is just the beginning. What often turns a minor nuisance into a major repair bill are the secondary problems that develop:
Woodpecker damage can dramatically worsen the situation. These birds have incredible hearing and can detect the larvae inside the wood. Their aggressive pecking creates large, irregular gouges as they hunt for this protein-rich meal.
Water infiltration through tunnel openings allows moisture to seep deep into your home’s structure. This creates perfect conditions for mold and fungal growth – problems that can affect both your home’s integrity and your family’s health.
Over time, extensive tunnel networks seriously compromise structural integrity. What began as cosmetic damage can lead to siding boards becoming loose or detached. I’ve seen cases where neglected tunnels eventually connected to create networks spanning several feet inside the wall!
Measuring the Real Cost of Damage
The financial impact of carpenter bees wood siding damage grows exponentially the longer it’s ignored. Based on internet data (not our specific pricing at Biggins), here’s what homeowners might expect:
Minor repairs involving filling and painting a few isolated holes might run $200-$500. When the damage requires replacing several boards, costs typically jump to $500-$1,200. But I’ve seen major repairs requiring extensive siding replacement due to structural damage reach $1,200-$5,000 or more.
These costs multiply when you factor in the exponential nature of tunnel reuse. Each generation of bees can expand existing tunnels, accelerating damage year after year. Then there’s secondary damage repair – fixing water damage, mold remediation, or repairing woodpecker damage adds significantly to the bill.
Many homeowners don’t consider how visible bee damage affects property value. Those small holes and stains can substantially reduce curb appeal and home valuation during sales. There’s also an energy efficiency cost – compromised siding reduces insulation effectiveness, potentially increasing your heating and cooling bills.
Throughout my years serving Middlesex County communities, I’ve consistently found that addressing carpenter bee issues early through prevention and prompt treatment is far more cost-effective than dealing with extensive damage later. A simple inspection this spring could save you thousands in repairs down the road.
Prevention & Bee-Friendly Deterrents
When it comes to protecting your carpenter bees wood siding, prevention truly is your best defense. At Biggins, we’ve finded several effective strategies that keep these industrious insects away from your home while respecting their vital role as pollinators.
The single most powerful preventive measure is maintaining well-painted or sealed wood surfaces. Carpenter bees strongly prefer raw, weathered wood and will typically bypass properly finished surfaces. A quality exterior paint job can provide protection for 3-8 years before needing a refresh.
Beyond paint, we’ve seen great success with several bee-friendly deterrents that won’t harm these important pollinators:
Citrus and almond oil sprays work wonders because carpenter bees naturally avoid these scents. Simply mix 1 part citrus oil (or almond extract) with 10 parts water and apply to vulnerable areas regularly during spring and early summer. The pleasant aroma that repels bees will actually make your outdoor space more enjoyable for you!
Wind chimes hung near problem areas create gentle vibrations that discourage nesting. Plus, they add a lovely ambiance to your outdoor space – a win-win solution that protects your home while enhancing your yard.
Believe it or not, hanging fake wasp nests can be remarkably effective. Carpenter bees instinctively avoid nesting near wasp colonies, so these decoys exploit a natural avoidance behavior without any chemicals.
For more detailed information on these and other prevention strategies, visit our page on Carpenter Bees Under Siding.
Maintenance Coatings that Deter Drilling
Not all paint and finish applications provide equal protection against carpenter bees wood siding damage. Through our 40+ years of experience, we’ve learned what truly works best.
High-quality primer before paint makes all the difference. Think of primer as your first line of defense – it seals the wood and provides a solid foundation for your topcoats. Apply at least two topcoats afterward, maintaining adequate film thickness according to the manufacturer’s recommendations.
Pay special attention to end grain and horizontal surfaces, as these are particularly vulnerable to carpenter bee intrusion. These areas often weather faster than vertical surfaces and may need more frequent maintenance.
Oil-based penetrating stains offer excellent protection when properly maintained. However, semi-transparent stains should be reapplied more frequently than solid-color options. Clear sealers, while aesthetically pleasing for showing wood grain, provide the least protection and typically require annual maintenance.
Some homeowners have found success with specialty marine-grade varnishes. These products, designed to withstand harsh ocean environments, create a hard surface that bees struggle to penetrate. They do require regular maintenance but provide superior protection for those willing to commit to the upkeep.
The key is maintaining an intact finish without cracks, peeling, or thin spots that might attract carpenter bees. Remember to treat all sides of wood, including less visible areas like the undersides of horizontal surfaces – carpenter bees often start in these hidden spots!
Natural Repellents & Alternative Nest Sites
For eco-conscious homeowners seeking natural solutions to carpenter bees wood siding problems, we’ve helped many clients implement effective, chemical-free approaches.
Citrus oil spray has proven remarkably effective in our experience. Mix 1 cup of citrus oil (orange, lemon, or lime) with 1 gallon of water and a few drops of dish soap. This creates a pleasant-smelling barrier that bees avoid. Apply this solution every few days during peak bee season, especially after rain.
Almond oil treatments work similarly to citrus oil. The strong scent disrupts the bees’ sensory perception, making your home less appealing. Mix 1 part almond extract with 10 parts water and apply to vulnerable areas around your home.
Sound and vibration deterrents offer another natural approach. Wind chimes or small speakers playing music near problem areas create vibrations that carpenter bees find disruptive. Many of our clients in Wilmington have found this method both effective and aesthetically pleasing.

One of our favorite solutions is creating “bee hotels” from untreated softwood blocks with pre-drilled holes. Place these in sunny locations away from your home to provide alternative nesting sites. This approach acknowledges the ecological importance of carpenter bees while redirecting their activities away from your siding.
Sacrificial wood posts can serve as effective decoys. Install untreated, weathered softwood posts in your yard, away from structures. These become preferred nesting sites, drawing bees away from your home. It’s a simple solution that many of our Massachusetts customers have implemented with great success.
Setting an Inspection & Maintenance Calendar
Establishing a regular inspection routine is crucial for preventing carpenter bees wood siding damage. After four decades of helping homeowners throughout Middlesex County, we’ve developed this effective seasonal schedule:
Early Spring (March-April) is when you’ll want to complete a thorough inspection of all wood surfaces. This is when overwintered bees emerge from old holes, so catching them early is key. Apply preventive treatments before nesting begins and seal any holes from previous seasons.
Late Spring/Early Summer (May-June) requires weekly checks of vulnerable areas during peak nesting season. This is when females are actively drilling and establishing nests. Apply repellent sprays every 3-4 days, especially after rain, and monitor for new holes and fresh sawdust. Address any new activity immediately – early intervention prevents major infestations.
By Late Summer (August-September), you should inspect for emergence holes from new adults. Make note of these locations for fall repairs and apply preventive treatments to deter overwintering bees. This proactive approach breaks the cycle before it can continue next spring.
Fall (October-November) is your final opportunity before winter to repair and seal all holes after bees have emerged. Apply final protective coatings before cold weather sets in. Fall is actually the ideal time for major repairs since all bee activity has ceased.
By tracking previous hole locations and maintaining detailed records, you can identify patterns and focus your prevention efforts on the most vulnerable areas of your home. This systematic approach has helped countless homeowners throughout Wilmington, Bedford, Woburn and surrounding communities maintain beautiful, bee-free exteriors year after year.
Safe Removal, Treatment & Repair Strategies
When prevention hasn’t worked and you’re facing active carpenter bees wood siding issues, it’s time to take action. At Biggins Exterminating, we’ve developed effective approaches that protect your home while being mindful of environmental impact.
For active infestations, several treatment options have proven successful over our four decades of experience. Insecticidal dusts containing boric acid or pyrethrin work wonderfully when applied directly into tunnel entrances. These fine powders cling to the bees as they steer their galleries, effectively treating the entire tunnel system without excessive chemical use.
A precision duster tool (like a Centro duster) makes all the difference in application. Think of it as a miniature powder puffer that lets you direct the treatment exactly where it’s needed—into those perfect half-inch holes.
Timing matters tremendously. We recommend applying treatments at dusk when most bees have returned to their nests for the night. This simple timing trick maximizes contact with the entire bee population. Here’s a helpful tip from our technicians: use a red-filtered flashlight during evening applications. Bees can’t see red light well, so you can work without alerting or agitating them.
For those preferring non-chemical approaches, carpenter bee traps can capture males, though this has limited impact on the overall infestation since males don’t create tunnels.
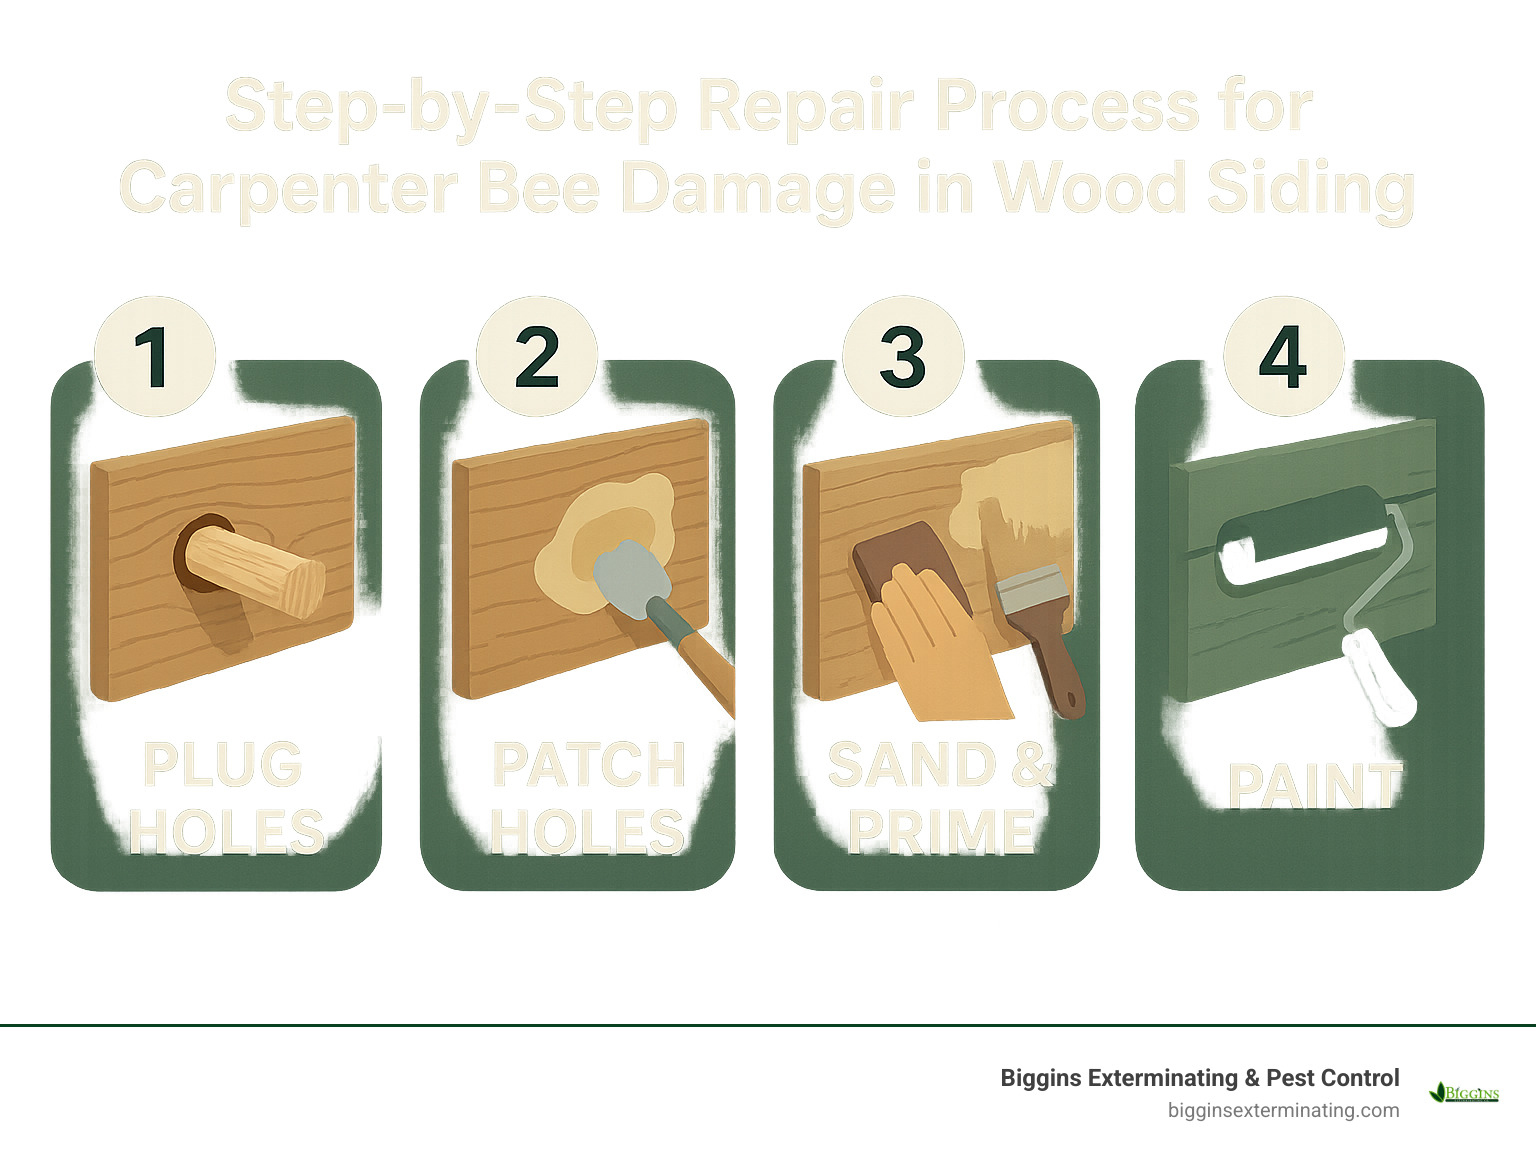
After treatment, proper repair becomes essential:
- Wait several days post-treatment to ensure bees have contacted the treatment
- Plug holes thoroughly using wood dowels, steel wool, and exterior-grade caulk
- Sand the surface smooth to create a seamless finish
- Prime and paint to match your existing siding
For more detailed guidance, visit our page on How to Get Rid of Wood Boring Bees.
Non-Lethal Relocation & Traps
Many homeowners express concern about harming these important pollinators. If conservation is important to you, several non-lethal approaches can effectively manage carpenter bees:
Specialized wooden traps mimic carpenter bee tunnels but lead to a collection chamber instead. The key is early placement—mount these traps on posts near (but not directly on) your home in sunny locations before nesting season begins in spring.
Timing is everything with non-lethal methods. Early spring before egg-laying begins or late fall after new adults have emerged offers the best window for intervention. Before sealing old tunnels, always confirm they’re unoccupied by listening for activity or gently probing with a flexible wire to check for resistance.
Creating alternative habitat away from your home can redirect these industrious insects. Untreated softwood blocks or logs placed in sunny locations often prove irresistible to carpenter bees looking for nesting sites.
While these gentler methods may not eliminate every carpenter bee from your property, they can significantly reduce damage to your home’s wood siding while supporting these valuable native pollinators that benefit your garden and local ecosystem.
Targeted Dusting & Spray Barrier
When non-lethal methods aren’t providing adequate protection for your carpenter bees wood siding, more direct intervention becomes necessary:
For dusting application, start by identifying all active entrance holes—look for fresh sawdust or bee activity. Waiting until evening ensures most bees are inside their tunnels. Using a properly designed duster tool, apply a light insecticidal dust like Pyganic Dust directly into each entrance hole with just enough force to penetrate the tunnel system without blowing back out. The brilliance of this method is that bees moving through the tunnels will naturally distribute the dust throughout their gallery.
Residual barrier sprays create a protective shield on wood surfaces. Focus application on areas with a history of carpenter bee activity, and remember to reapply according to product instructions—typically every 30-90 days during active seasons.
Safety always comes first. Wear appropriate personal protective equipment, follow label instructions precisely, avoid application during windy conditions, and keep pets and children away from treated areas until completely dry.
Through our extensive experience serving Andover, North Reading, Tewksbury and surrounding Massachusetts communities, we’ve finded that proper application technique matters just as much as the product used. Our technicians apply treatments with precision, minimizing environmental impact while maximizing effectiveness.
Plugging, Patching & Restoring Siding (carpenter bees wood siding)
After successfully treating active carpenter bees wood siding infestations, proper repair becomes the crucial final step to prevent re-infestation and restore your home’s beauty and protection.
Timing your repairs strategically makes all the difference. Wait until late fall when bee activity has ceased completely. Always confirm tunnels are empty before sealing—a small amount of citrus oil applied into the tunnel can help drive out any stragglers.
The repair method depends on the hole condition. For small, clean holes, insert a wood dowel of matching diameter, secured with exterior wood glue and cut flush with the surface. Irregular or damaged holes respond better to wood putty or exterior wood filler. When facing extensive damage, replacing the affected section of siding or trim might be more practical. For those deep tunnels that extend far into the wood, packing steel wool into the tunnel before sealing creates an effective barrier against re-excavation.
The finishing touches transform a repair into an invisible fix. Sand the repaired area smooth, apply primer specifically formulated for exterior wood, then paint with matching exterior paint, extending slightly beyond the repair area to blend seamlessly. Two coats provide maximum protection against future carpenter bee interest.
For extensive damage across multiple boards, professional repair often proves more cost-effective than DIY approaches. At Biggins Exterminating & Pest Control, we’re happy to recommend trusted contractors in the Wilmington area who specialize in siding repair and replacement—just ask us during your service visit.
Choosing Bee-Resistant Siding Materials
When you’re facing ongoing carpenter bees wood siding challenges or planning a renovation, selecting bee-resistant materials can save you years of headaches. I’ve seen countless homeowners in Wilmington breathe a sigh of relief after switching to more resistant siding options.
Wood siding certainly has its charms, but not all wood is created equal when it comes to carpenter bee resistance. Hardwoods like oak, maple, and walnut naturally deter these persistent pollinators much better than softwoods—though they’ll stretch your budget considerably. Pressure-treated pine offers moderate resistance, but still needs proper finishing to truly keep the bees at bay. And while cedar and redwood create that beautiful natural aesthetic many homeowners love, they’re practically sending an invitation to carpenter bees when left unfinished.
Vinyl siding presents an interesting middle ground. The material itself is completely immune to carpenter bee damage (they can’t drill through plastic!), but there’s a catch. The natural expansion and contraction of vinyl can create small gaps over time, giving resourceful bees access to the wooden structural elements hiding behind your siding. If you’re going the vinyl route, insist on proper installation with insect-resistant backing for comprehensive protection.
In my four decades helping Massachusetts homeowners, I’ve become increasingly impressed with fiber-cement siding for bee protection. This remarkable material—made from cement, sand, and cellulose fibers—completely eliminates carpenter bee concerns. It convincingly mimics the appearance of wood without requiring any special treatments to deter bees. Even better, it typically lasts 30-50 years with minimal upkeep, making it a smart long-term investment.
Don’t forget about those finishing touches! PVC and composite trim materials offer the aesthetic appeal of wood for fascia, soffits, and window trim (all prime carpenter bee targets) without any of the vulnerability.
Based on internet averages (not our specific pricing at Biggins), replacement costs typically range from $7-$21 per square foot, depending on your material choice and local labor rates. While fiber-cement and composite materials might hit your wallet harder upfront, their long-term resistance to carpenter bees and minimal maintenance requirements often make them more economical over time.
Comparing Wood, Vinyl & Fiber Cement Siding for Carpenter Bee Resistance
When helping our Middlesex County customers evaluate their options specifically for carpenter bee protection, I like to break down the key differences:
| Siding Type | Carpenter Bee Resistance | Maintenance Needs | Lifespan | Cost Range* |
|---|---|---|---|---|
| Wood (Cedar/Pine) | Low (unless regularly painted) | High (repaint every 3-8 years) | 20-40 years | $7-$15/sq ft |
| Wood (Hardwood) | Moderate | Moderate to High | 20-40 years | $9-$18/sq ft |
| Vinyl | High (but gaps can allow access to wood behind) | Low | 20-40 years | $4-$12/sq ft |
| Fiber Cement | Very High (immune) | Low | 30-50+ years | $5-$13.50/sq ft |
| Composite | Very High (immune) | Low | 20-40 years | $7-$21/sq ft |
*Cost ranges based on internet data, not Biggins Exterminating & Pest Control pricing
Beyond the basics, there are some practical considerations worth mentioning. Paint retention is a significant advantage with fiber cement, which holds its protective coating significantly longer than wood—extending your defense against carpenter bees without frequent repainting. The expansion gaps necessary for vinyl siding can sometimes create unexpected access points for determined bees to reach wooden structural elements behind the siding.
Many homeowners in our service area are also considering insulated siding systems, which provide an additional barrier against carpenter bee penetration while improving your home’s energy efficiency—a win-win in our Massachusetts climate. Speaking of our unique weather, materials here must withstand harsh freeze-thaw cycles, which can create tiny cracks in some siding types that may eventually attract carpenter bees looking for easy entry points.
For my customers in Lexington, Burlington, and surrounding communities who’ve battled persistent carpenter bee problems, I often suggest considering fiber cement or composite materials, especially for highly vulnerable areas like fascia boards, soffits, and decorative trim. These targeted replacements can dramatically reduce your carpenter bee issues without requiring a complete siding overhaul.
Frequently Asked Questions about Carpenter Bees and Wood Siding
Do carpenter bees actually eat the wood?
One of the most common misconceptions I hear from homeowners is that carpenter bees are “eating” their siding. This isn’t the case at all!
Unlike termites, carpenter bees wood siding damage occurs because they’re excavating tunnels solely for nesting purposes—not for food. The bees carefully drill and remove wood particles, creating those telltale sawdust piles you’ll notice beneath entrance holes. Their actual diet consists entirely of flower nectar and pollen, which makes them valuable pollinators in your garden.
This distinction is crucial because it affects how we approach treatment. Products designed to kill wood-consuming insects like termites target different behaviors and won’t effectively address carpenter bee issues. When we understand that carpenter bees are simply looking for a protected place to raise their young, we can develop more targeted and effective solutions.
When is the best time of year to treat tunnels?
Timing is everything when addressing carpenter bees wood siding problems. Through decades of experience in Massachusetts, we’ve identified three optimal treatment windows:
Early spring (March-April) provides a perfect opportunity to act before nesting activity kicks into high gear. This is when overwintered bees are just becoming active but haven’t yet laid eggs. Treating during this window can break the reproductive cycle before it begins.
Evening hours during active season are ideal for treatment application. Carpenter bees return to their tunnels at dusk, so treating then ensures most of the population is inside where your treatment will reach them.
Late summer/early fall (August-September) offers another effective window after new adults have emerged but before they select overwintering sites. This timing helps reduce next year’s population.
I always advise our Woburn and Billerica customers to avoid mid-day treatments when bees are actively foraging—you’ll miss most of the population and waste your effort. Similarly, timing repairs for late fall ensures tunnels are empty before sealing them up. Working with the carpenter bee life cycle rather than against it dramatically improves your results.
Will painting alone guarantee protection?
While a fresh coat of paint is one of your best defenses against carpenter bees wood siding problems, I wouldn’t call it a guaranteed solution. Here’s what I tell homeowners after four decades in the pest control business:
Paint quality matters significantly. High-quality exterior paint properly applied with the right primers provides much better protection than budget options. That extra money spent upfront often saves much more in potential damage.
Even the best paint job has an expiration date. In our New England climate, even premium exterior paints typically last 3-8 years before beginning to deteriorate, creating vulnerable spots that bees can exploit.
Complete coverage is essential. Carpenter bees are surprisingly clever at finding unpainted or thinly painted areas, especially on the undersides of horizontal surfaces like fascia boards and eaves—places homeowners often miss during painting projects.
Particularly determined females might occasionally drill through paint, especially if the wood beneath is a highly preferred species like cedar or pine. I’ve seen it happen, though it’s relatively rare when paint is properly maintained.
For maximum protection, I recommend a multi-layered approach: maintain regular painting schedules, conduct routine inspections (especially in spring), and consider applying natural repellents like citrus oil during peak activity seasons. This comprehensive strategy has helped countless homeowners throughout Wilmington and surrounding communities keep carpenter bees from damaging their homes while respecting these important pollinators.
Conclusion
Balancing the protection of your home with respect for these valuable pollinators is the key to addressing carpenter bees wood siding challenges effectively. After four decades of helping homeowners throughout Wilmington and surrounding Massachusetts communities, we’ve learned that a thoughtful, multi-faceted approach works best.
Your home is likely one of your biggest investments, and those perfect half-inch holes can lead to significant damage if left unchecked. But remember—carpenter bees play a crucial role in our ecosystem, contributing to about 15% of agricultural pollination. The good news is you don’t have to choose between your home’s integrity and environmental responsibility.
Early detection truly makes all the difference. Those spring inspections might seem tedious, but spotting fresh sawdust or new holes before extensive tunneling occurs can save you thousands in potential repairs. Make it a habit to scan your eaves, fascia boards, and horizontal wood surfaces when the weather first warms.
Well-maintained wood surfaces create your first line of defense. That fresh coat of quality exterior paint isn’t just about curb appeal—it’s your primary shield against carpenter bee intrusion. The investment in regular maintenance pays dividends in protection.
When prevention hasn’t been enough, combining approaches works better than relying on just one solution. Those citrus oil sprays, strategic wind chimes, and sacrificial wood decoys might seem simple individually, but together they create a comprehensive deterrent system that respects the bees while protecting your home.
For homes with persistent problems, considering bee-resistant materials like fiber cement siding during your next renovation might be the wisest long-term investment. While the upfront costs may be higher than traditional wood, the peace of mind and reduced maintenance can make it worthwhile over time.
At Biggins Exterminating & Pest Control, we’re proud of our reputation for providing practical, effective solutions without pushing unnecessary contracts. Unlike many in our industry, we stand behind our single-service visits with solid warranties and a genuine commitment to your satisfaction.
Whether you’re in Andover, Bedford, Billerica, Burlington, Lexington, North Reading, Tewksbury, Wilmington, or Woburn, our team brings local knowledge and decades of hands-on experience to every carpenter bee situation we address. We understand the unique challenges of New England homes and the specific carpenter bee behaviors in our region.
Ready to tackle your carpenter bees wood siding issues with a balanced, effective approach? Visit our dedicated page on Carpenter Bees Pest Control or reach out for a personalized consultation. Let’s protect your home while respecting these important pollinators—together.
